Plot pulse sequences
After programming a pulse sequence, we sometimes want to visually inspect what it looks like. The
helper function utils.plot_sequence() does just that. Here is an example to highlight all
the features. We program the pulse sequence in the same way we do it when we want to run the
experiment. If we don’t have access to a Presto unit at the moment, we can pass dry_run=True to
the Pulsed object. If we don’t get any error messages, we are sure the pulses sequence
will run once we connect to Presto.
from presto import pulsed
from presto.hardware import AdcMode, DacMode
from presto.utils import plot_sequence
import numpy as np

with pulsed.Pulsed(dry_run=True, adc_mode=AdcMode.Mixed, dac_mode=DacMode.Mixed) as pls:
    pls.hardware.configure_mixer(freq=5.2e9, in_ports=1, out_ports=1)
    pls.hardware.configure_mixer(freq=5.5e9, out_ports=2)

    pls.setup_scale_lut(1, 0, np.linspace(-1, 1, 101), axis=0)
    pls.setup_scale_lut(1, 1, np.linspace(-1, 1, 128), axis=1)
    pls.setup_scale_lut(2, 0, 0.5)
    pls.setup_freq_lut(
        output_ports=1,
        group=0,
        frequencies=np.linspace(10e6, 100e6, 128),
        phases=[0.0] * 128,
        phases_q=[np.pi / 2] * 128,
        axis=1,
    )

    readout = pls.setup_long_drive(
        1, 0, 500e-9, rise_time=50e-9, fall_time=30e-9, amplitude=1 + 1j * 0.7, envelope=True
    )

    readout_1 = pls.setup_long_drive(
        1, 1, 500e-9, rise_time=50e-9, fall_time=30e-9, amplitude=1 + 1j * 0.05, envelope=False
    )
    control = pls.setup_template(2, 0, np.ones(40) - 1j * np.ones(40))

    pls.set_store_ports(1)
    pls.set_store_duration(1e-6)
    matches = pls.setup_template_matching_pair(
        1,
        np.cos(2 * np.pi * 100e6 * np.linspace(0, 100e-9, 100, False)),
        0.5 * np.sin(2 * np.pi * 100e6 * np.linspace(0, 100e-9, 100, False)),
    )

    T = 0.0
    pls.output_pulse(T, control)
    T += control.get_duration()
    pls.output_pulse(T, [readout, readout_1])
    pls.store(T + 230e-9)
    pls.match(T + 300e-9, matches)
    T += readout.get_duration()
    pls.next_scale(2000e-9, output_ports=1)
    pls.next_frequency(2000e-9, output_ports=1, group=0)
    T = 100e-6
    pls.run(T, (101, 128), 10)
To visualize the pulses we call utils.plot_sequence() just before or right after the
Pulsed.run() command.
plot_sequence(pls, T, (101, 128), 10)
We pass the pls object that contains all the information about the programmed sequence, as well
as the first three parameters that define the Pulsed.run() method: period, repeat_count,
and num_averages.
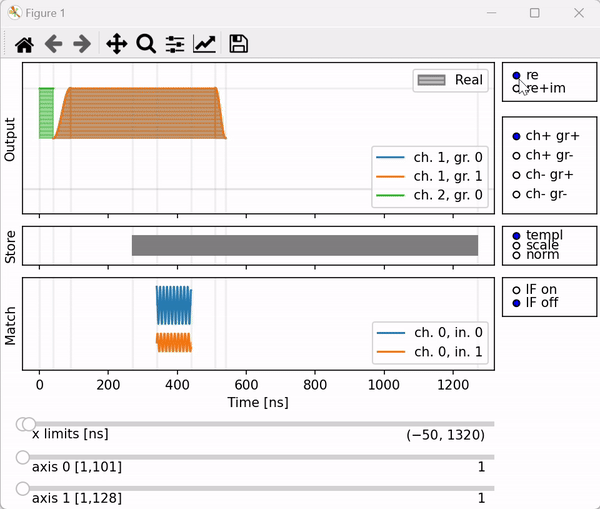
We get an interactive plot. The sequence contains 3 complex-valued pulses since we are running in
the Mixed mode. We can display only the real part (re), or both the real and the imaginary part
(re+im) of the pulses by toggling the (re, re+im) toggle in the upper-right corner. The real part
has a horizontal fill pattern, while the imaginary part has a vertical pattern. This way it is
possible to distinguish the real and imaginary parts even if they are identical.
To better see individual pulses, we can decide to display output channels together (ch+) or separately (ch-), as well as displaying groups together (gr+) or separately (gr-). Pulses keep their colors, only the baseline is moving when we use this toggle.
It is possible to display raw templates (templ), templates multiplied by scales (scale) or normalized templates (norm) in case a template contains really small values and is hard to see in the first two modes.
The sampling windows and the matching templates are displayed in the store and match plots.
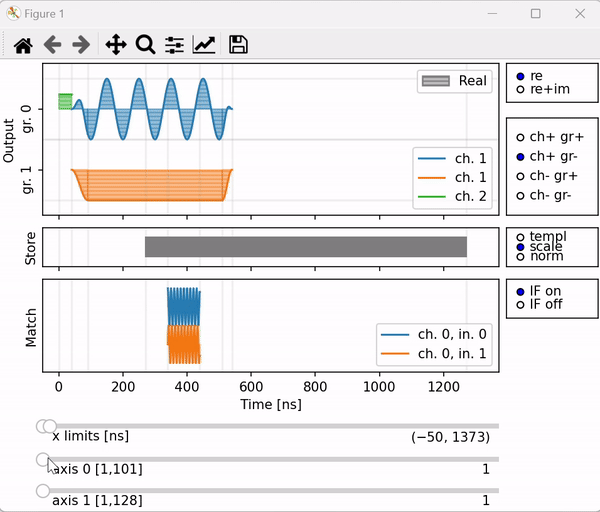
It is possible to perform multidimensional sweeps with Presto by passing a tuple to the
repeat_count attribute. In this example, we perform a two-dimensional sweep 101x128. The
frequency of the blue pulse and the amplitude of the orange pulse is simultaneously swept in the
inner loop (axis=1), and the amplitude of the blue pulse is swept in the outer loop (axis=0).
We can visualize the pulses in each iteration by moving the sliders. The number on the right of the
axis sliders indicates the index of the iteration. The x-limit slider allows for the x limits of
the plot to be adjusted.